Free AI 3D Figurine Generator - Create 3D Character Models
Generate stunning 3D figurines and character models instantly with AI. Free 3D figurine generator powered by Nano Banana Pro and Dreamina. Create collectible figures, character designs, and 3D art in seconds. Perfect for designers, collectors, and creators.
1. What is 3D Figurine Generator?
The 3D Figurine Generator is a cutting-edge AI tool designed to transform your imagination into stunning, tangible-looking 3D character models and collectibles. Powered by advanced AI models like Nano Banana Pro, Dreamina, and SeeDream, this tool specializes in rendering high-fidelity figurine styles ranging from realistic action figures and intricate resin statues to adorable chibi characters and stylized vinyl toys. Whether you are a toy designer, a 3D printing enthusiast, or a digital artist, the 3D Figurine Generator streamlines the concepting phase, allowing you to visualize prototypes with realistic lighting, textures, and materials instantly. It bridges the gap between 2D concept art and 3D visualization, offering a playground for creating "blind box" style toys, Nendoroid-inspired figures, and museum-quality sculptures without needing complex 3D modeling software.
Key Features 🌟
- 🎭 Style Versatility: Effortlessly switch between diverse styles including Realistic Action Figures, Anime/Manga Statues, Chibi/Nendoroid, Funko Pop, and Designer Vinyl Toys. The AI adapts proportion and aesthetics to match specific toy lines.
- 🔄 Character Consistency: Maintain core character traits across different generations. Using specific seed numbers or reference images ensures your character's identity remains recognizable even when changing outfits or poses.
- 🧘 Pose Control: Direct your figurine's posture with precision. From dynamic combat stances to neutral "T-poses" or casual sitting positions, the generator respects anatomical constraints typical of physical figures.
- 🎨 Material Rendering: Achieve photorealistic surface finishes. Specify materials like PVC, Matte Vinyl, Clear Resin, Polystone, Metallic, or Hand-painted Clay to see exactly how light interacts with your figurine's surface.
- 💎 Collectible Quality: The output mimics professional product photography, complete with studio lighting, depth of field (bokeh), and sometimes even display bases, making the images look like premium unboxing shots.
- 🔄 Turnaround Views: Generate front, side, and back views (orthographic projections) to assist in 3D modeling or sculpting workflows. Essential for artists using the images as blueprints for ZBrush or Blender.
- 🖨️ Print-Ready Quality: High-resolution outputs suitable for reference in 3D printing workflows. While the tool generates 2D images, the clarity and definition assist significantly in the modeling process for physical production.
2. How to Use 3D Figurine Generator?
Creating professional-grade figurine concepts is simple. Follow this step-by-step guide to generate your own 3D collectibles.
Step 1: Describe Your Figurine Concept
The foundation of a great generation is a detailed prompt. You need to act as both the character designer and the product photographer. Define who the character is, the specific toy style, the material, and the pose.
Example Prompt:
3D cute chibi figurine of a cyberpunk cat hacker, wearing neon goggles and a hoodie, sitting on a server stack base. Material: matte vinyl with glossy visor. Style: Nendoroid, blind box toy design. Lighting: soft studio lighting, pastel background. High quality, 8k, 3d render, octane render, c4d. --ar 1:1
💡 Figurine Prompt Tips:
- Specify Style: Clearly state if you want "Funko Pop", "Nendoroid", "1/6 scale action figure", or "classical sculpture". This dictates the body proportions.
- Describe Character Details: Be specific about clothing, accessories, and colors. "Red cape", "holding a sword", "blue mechanical arm".
- Mention Materials: Textures define the look. Use keywords like "glossy plastic", "brushed metal", "soft clay", or "translucent resin".
- Request Specific Pose: "Standing heroically", "mid-air jump", "sitting cross-legged".
- Include Base/Stand: Adding "standing on a detailed diorama base" or "simple black circular base" adds realism to the toy aesthetic.
- Define Lighting: "Studio softbox", "rim lighting", or "dramatic shadows" enhance the 3D effect.
Step 2: Choose Generation Parameters
Select the right settings to ensure your output matches your vision.
- AI Model Selection:
- Nano Banana Pro: Best for high detail, complex textures, and realistic lighting. Ideal for "premium format" statues.
- Dreamina: Excellent for stylized, vibrant, and artistic interpretations. Great for "blind box" toys and creative designs.
- SeeDream: Solid choice for classic figurine looks and stable compositions.
- Image Size:
- 1:1 (Square): Perfect for general product shots and social media sharing.
- 3:4 or 2:3 (Portrait): Better for full-body standing figures to capture the entire height without cropping.
- 16:9 (Landscape): Useful for "turnaround" sheets containing multiple angles side-by-side.
- Generation Quantity: Generate a batch of 4 images at a time to explore variations in pose and material finish.
- Negative Prompt: Use this to exclude unwanted elements. Common negative prompts for figurines:
2D, sketch, drawing, painting, flat, blurry, low resolution, deformed, missing limbs, extra fingers, text, watermark.
Step 3: Generate & Refine
Once your settings are dialed in, hit Generate.
- Review: Look at the results. Check if the material looks right (e.g., is the "metal" shiny? is the "vinyl" smooth?).
- Upscale: If you find a perfect generation, use the Upscale feature to add more texture details, making it suitable for printing or close-up analysis.
- Variations: If you like the pose but want a different color scheme, use the Variation (or Remix) feature to keep the composition while tweaking the prompt.
- Multi-Angle: To see the back of the character, try appending "back view" or "side view" to your prompt and generating again with the same seed if possible, or use the "Reference Image" feature with your front view to guide the structure.
- Export: Download your images. These can now serve as concept art for client presentations or reference sheets for digital sculpting.
3. Use Cases & Example Prompts
3D figurines serve a wide range of creative and commercial purposes. From toy design to fan art, this section explores real-world applications and provides ready-to-use prompts for each scenario.
3.1 Collectible Toy Design (Designer Toys & Blind Boxes)
The collectible toy market thrives on unique character designs with consistent aesthetics. Designers use these AI-generated concepts to pitch new lines or test market appeal before manufacturing.
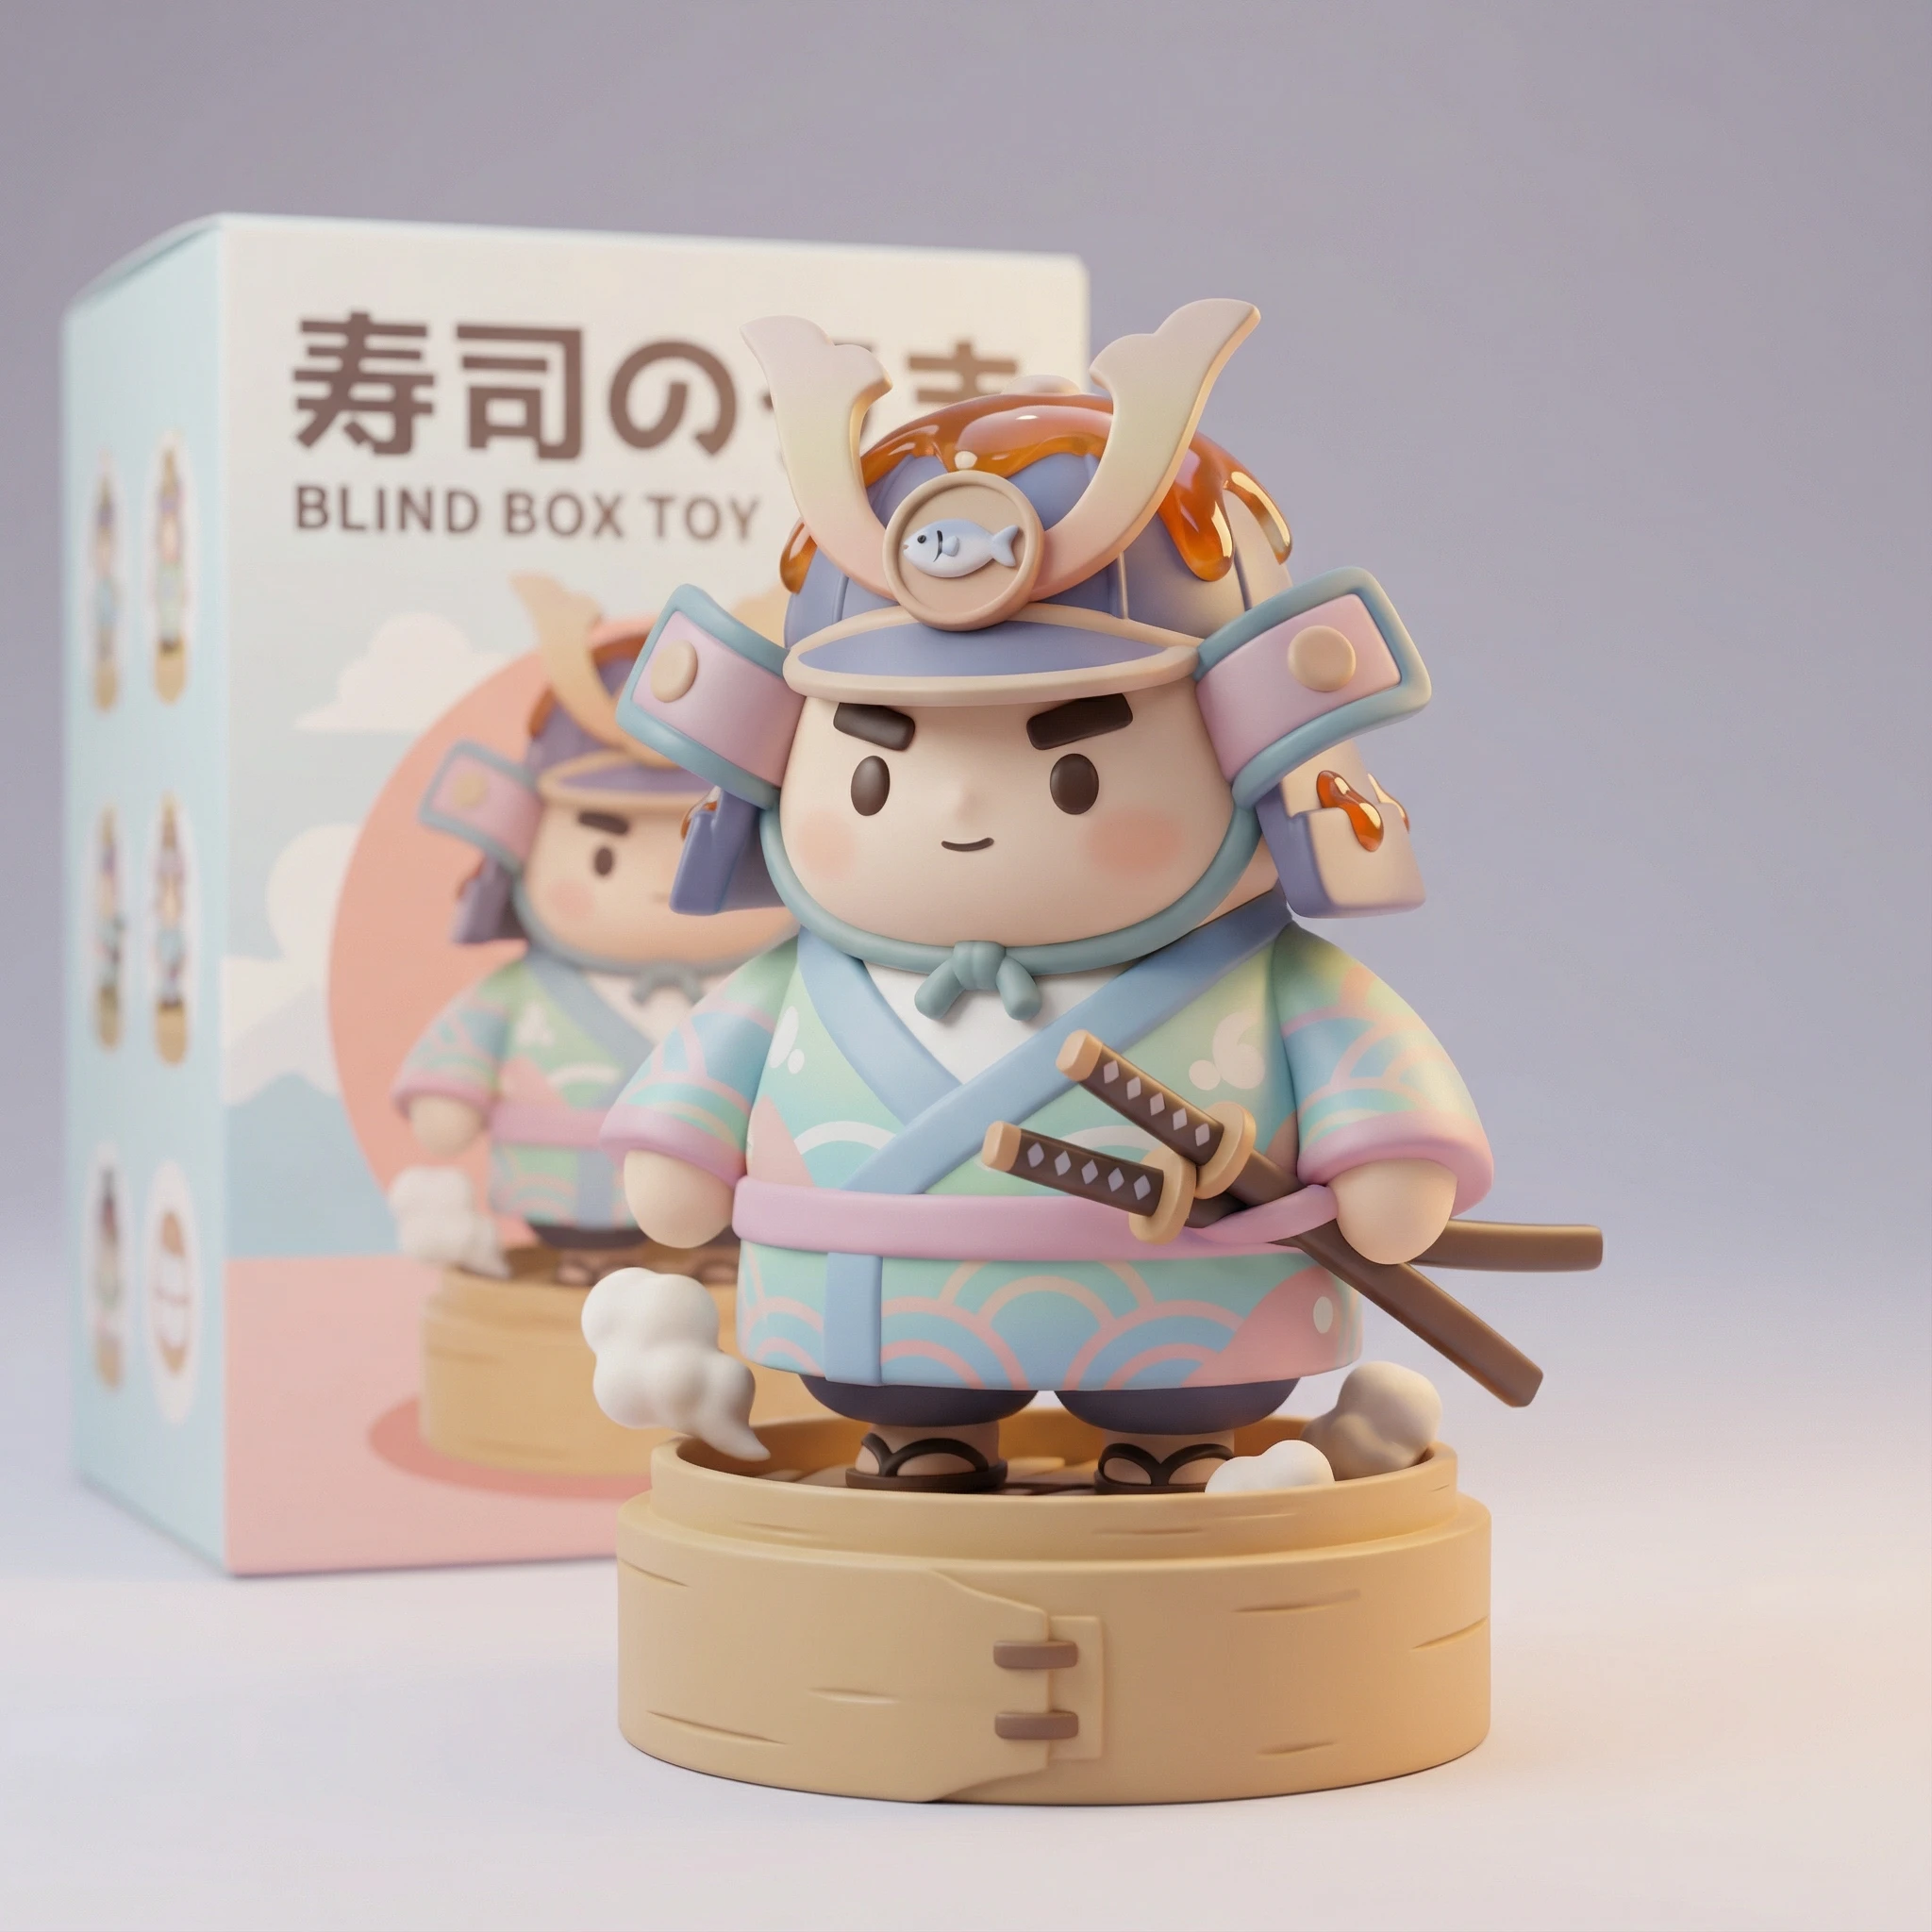
Application: Create a series of 8-12 figurines for a blind box collection with a unified theme (e.g., "Fantasy Food Warriors" or "Cyberpunk Animals").
Example Prompts:
3D cute chibi figurine of a samurai sushi chef, holding two katana chopsticks, standing on a bamboo steamer base. Material: matte vinyl with glossy sauce details. Nendoroid style, blind box toy, pastel colors, soft studio lighting, 4k.
3.2 3D Printing References (Hobbyists & Studios)
3D printing enthusiasts and professional prop makers use these images as visual targets when sculpting in ZBrush, Blender, or Nomad Sculpt. The AI output serves as a "north star" for maintaining proportion and detail density.
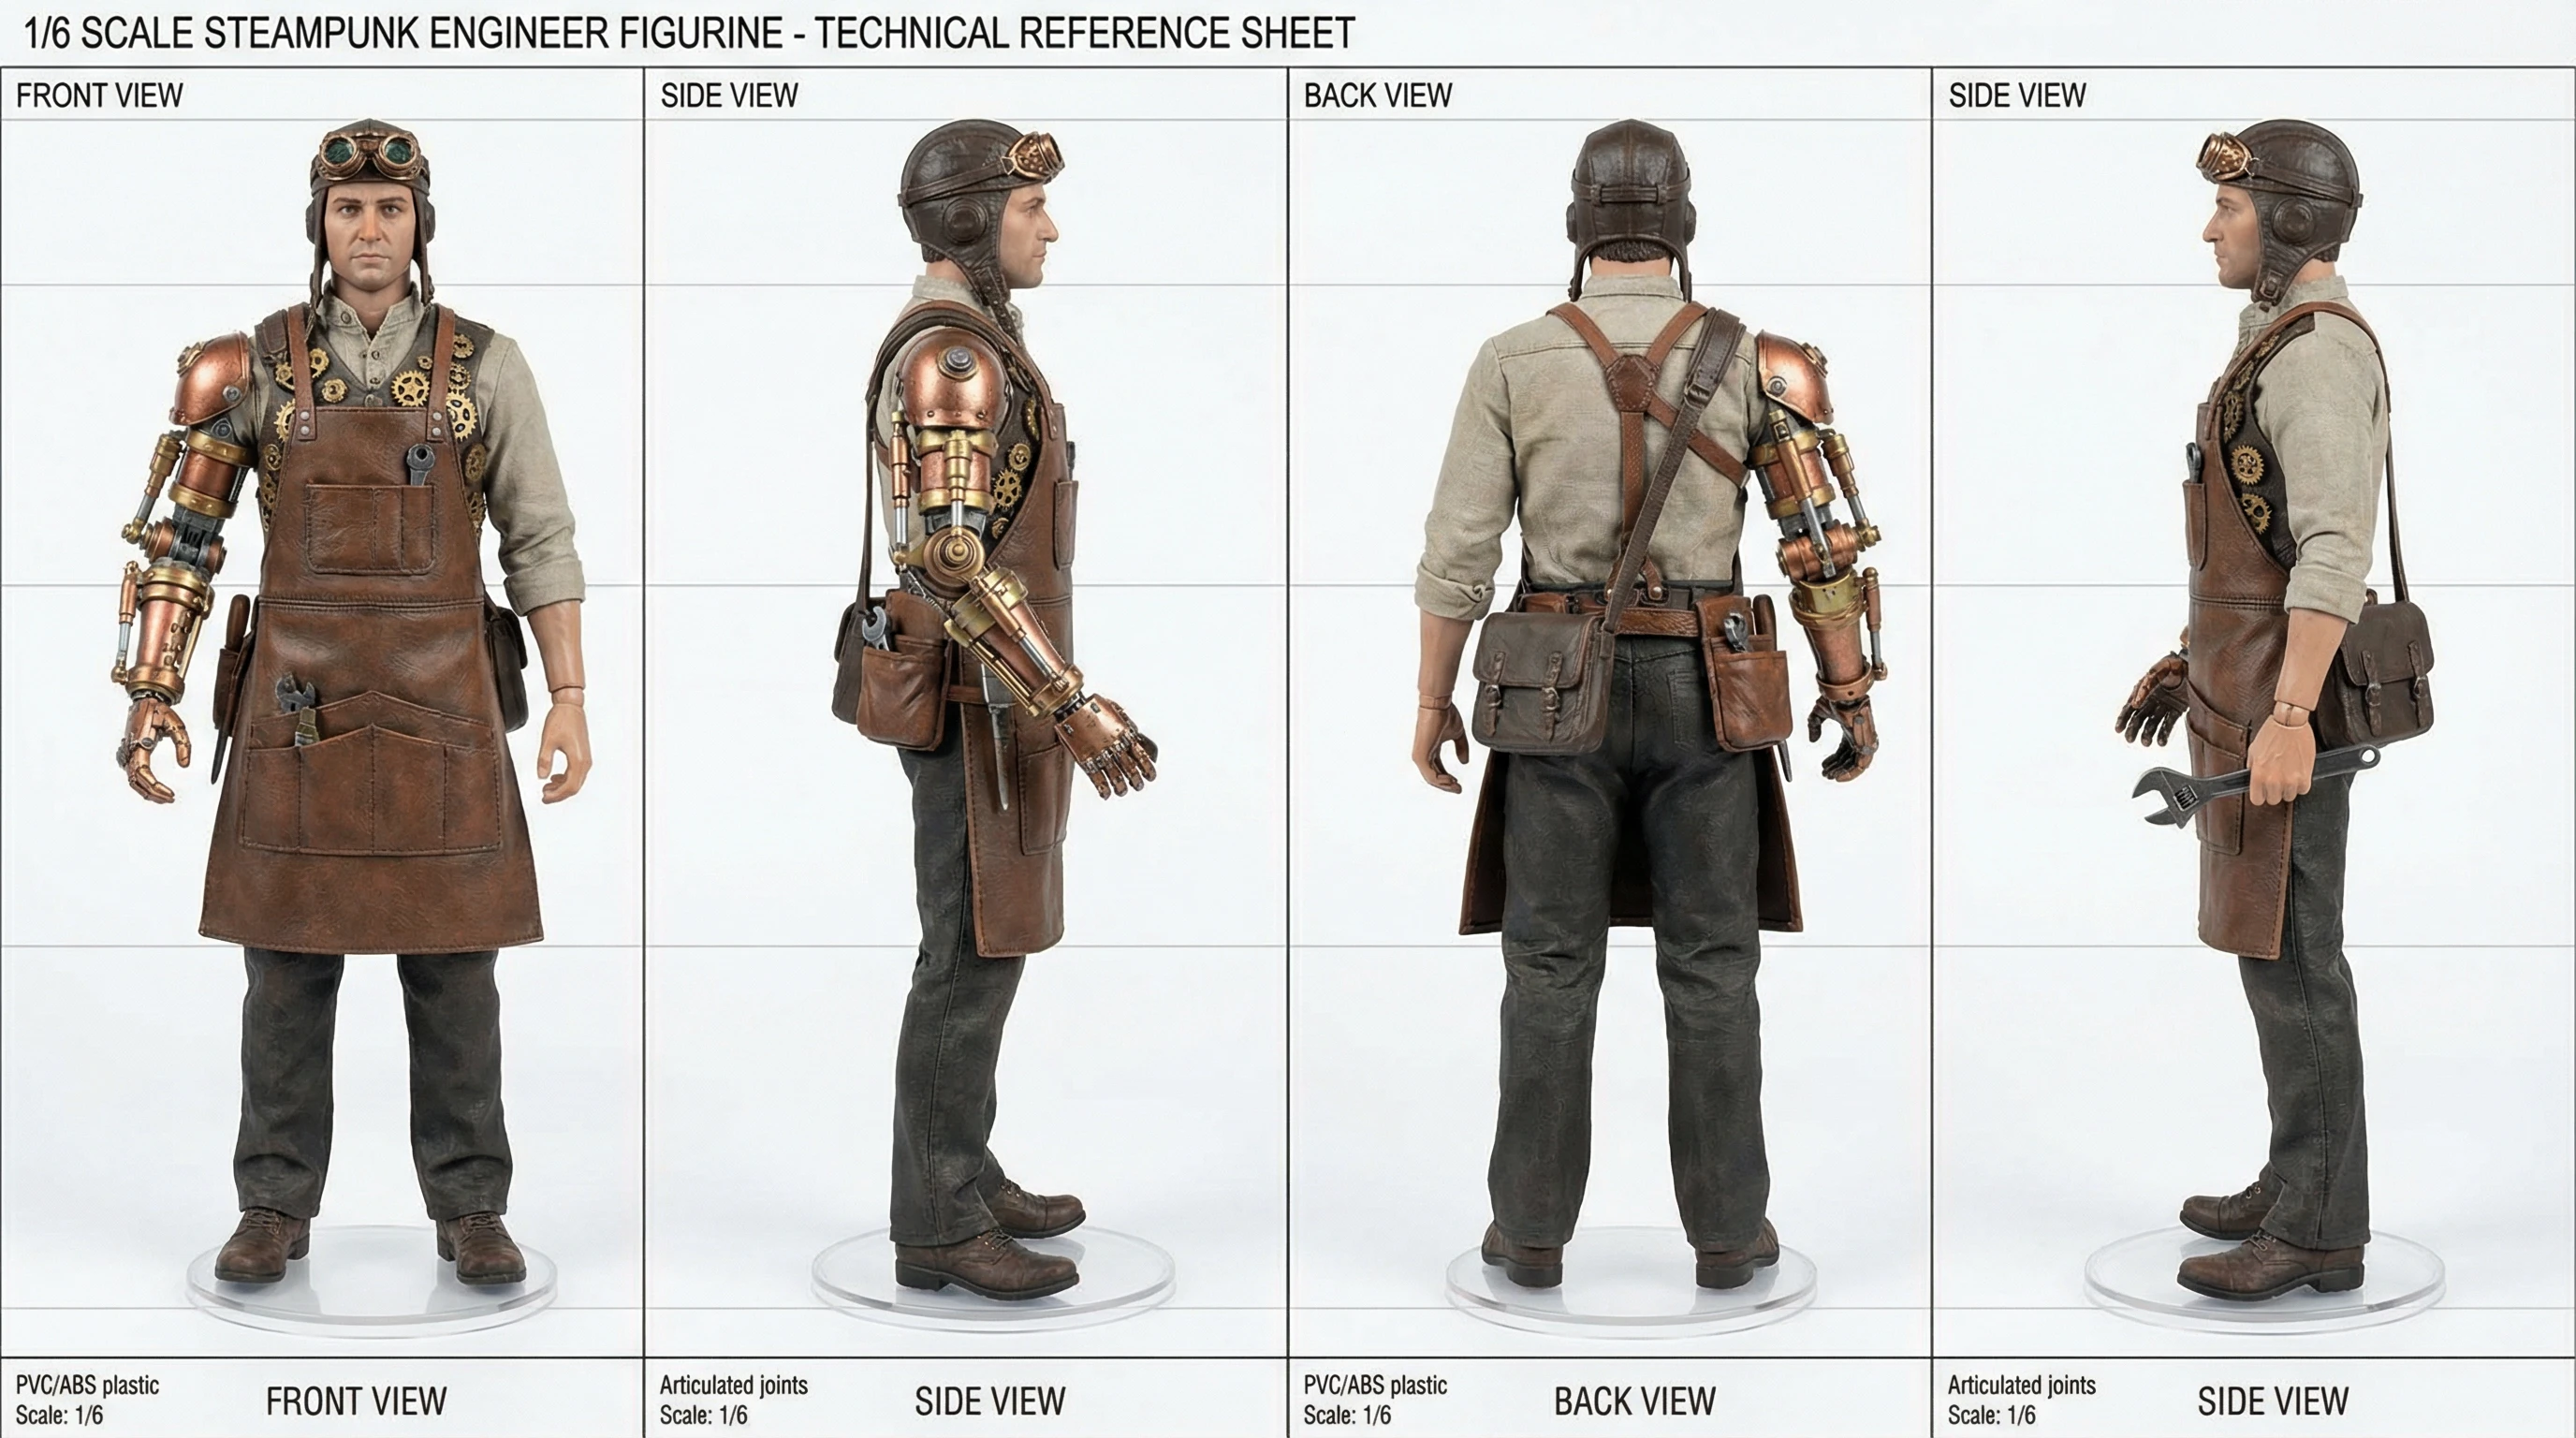
Application: Generate multi-angle turnaround sheets for consistent modeling reference.
Example Prompts:
Turnaround reference sheet of a 1/6 scale steampunk engineer figurine, front view, side view, back view. Detailed bronze goggles, leather apron, mechanical arm. PVC material, realistic action figure, technical reference, white background.
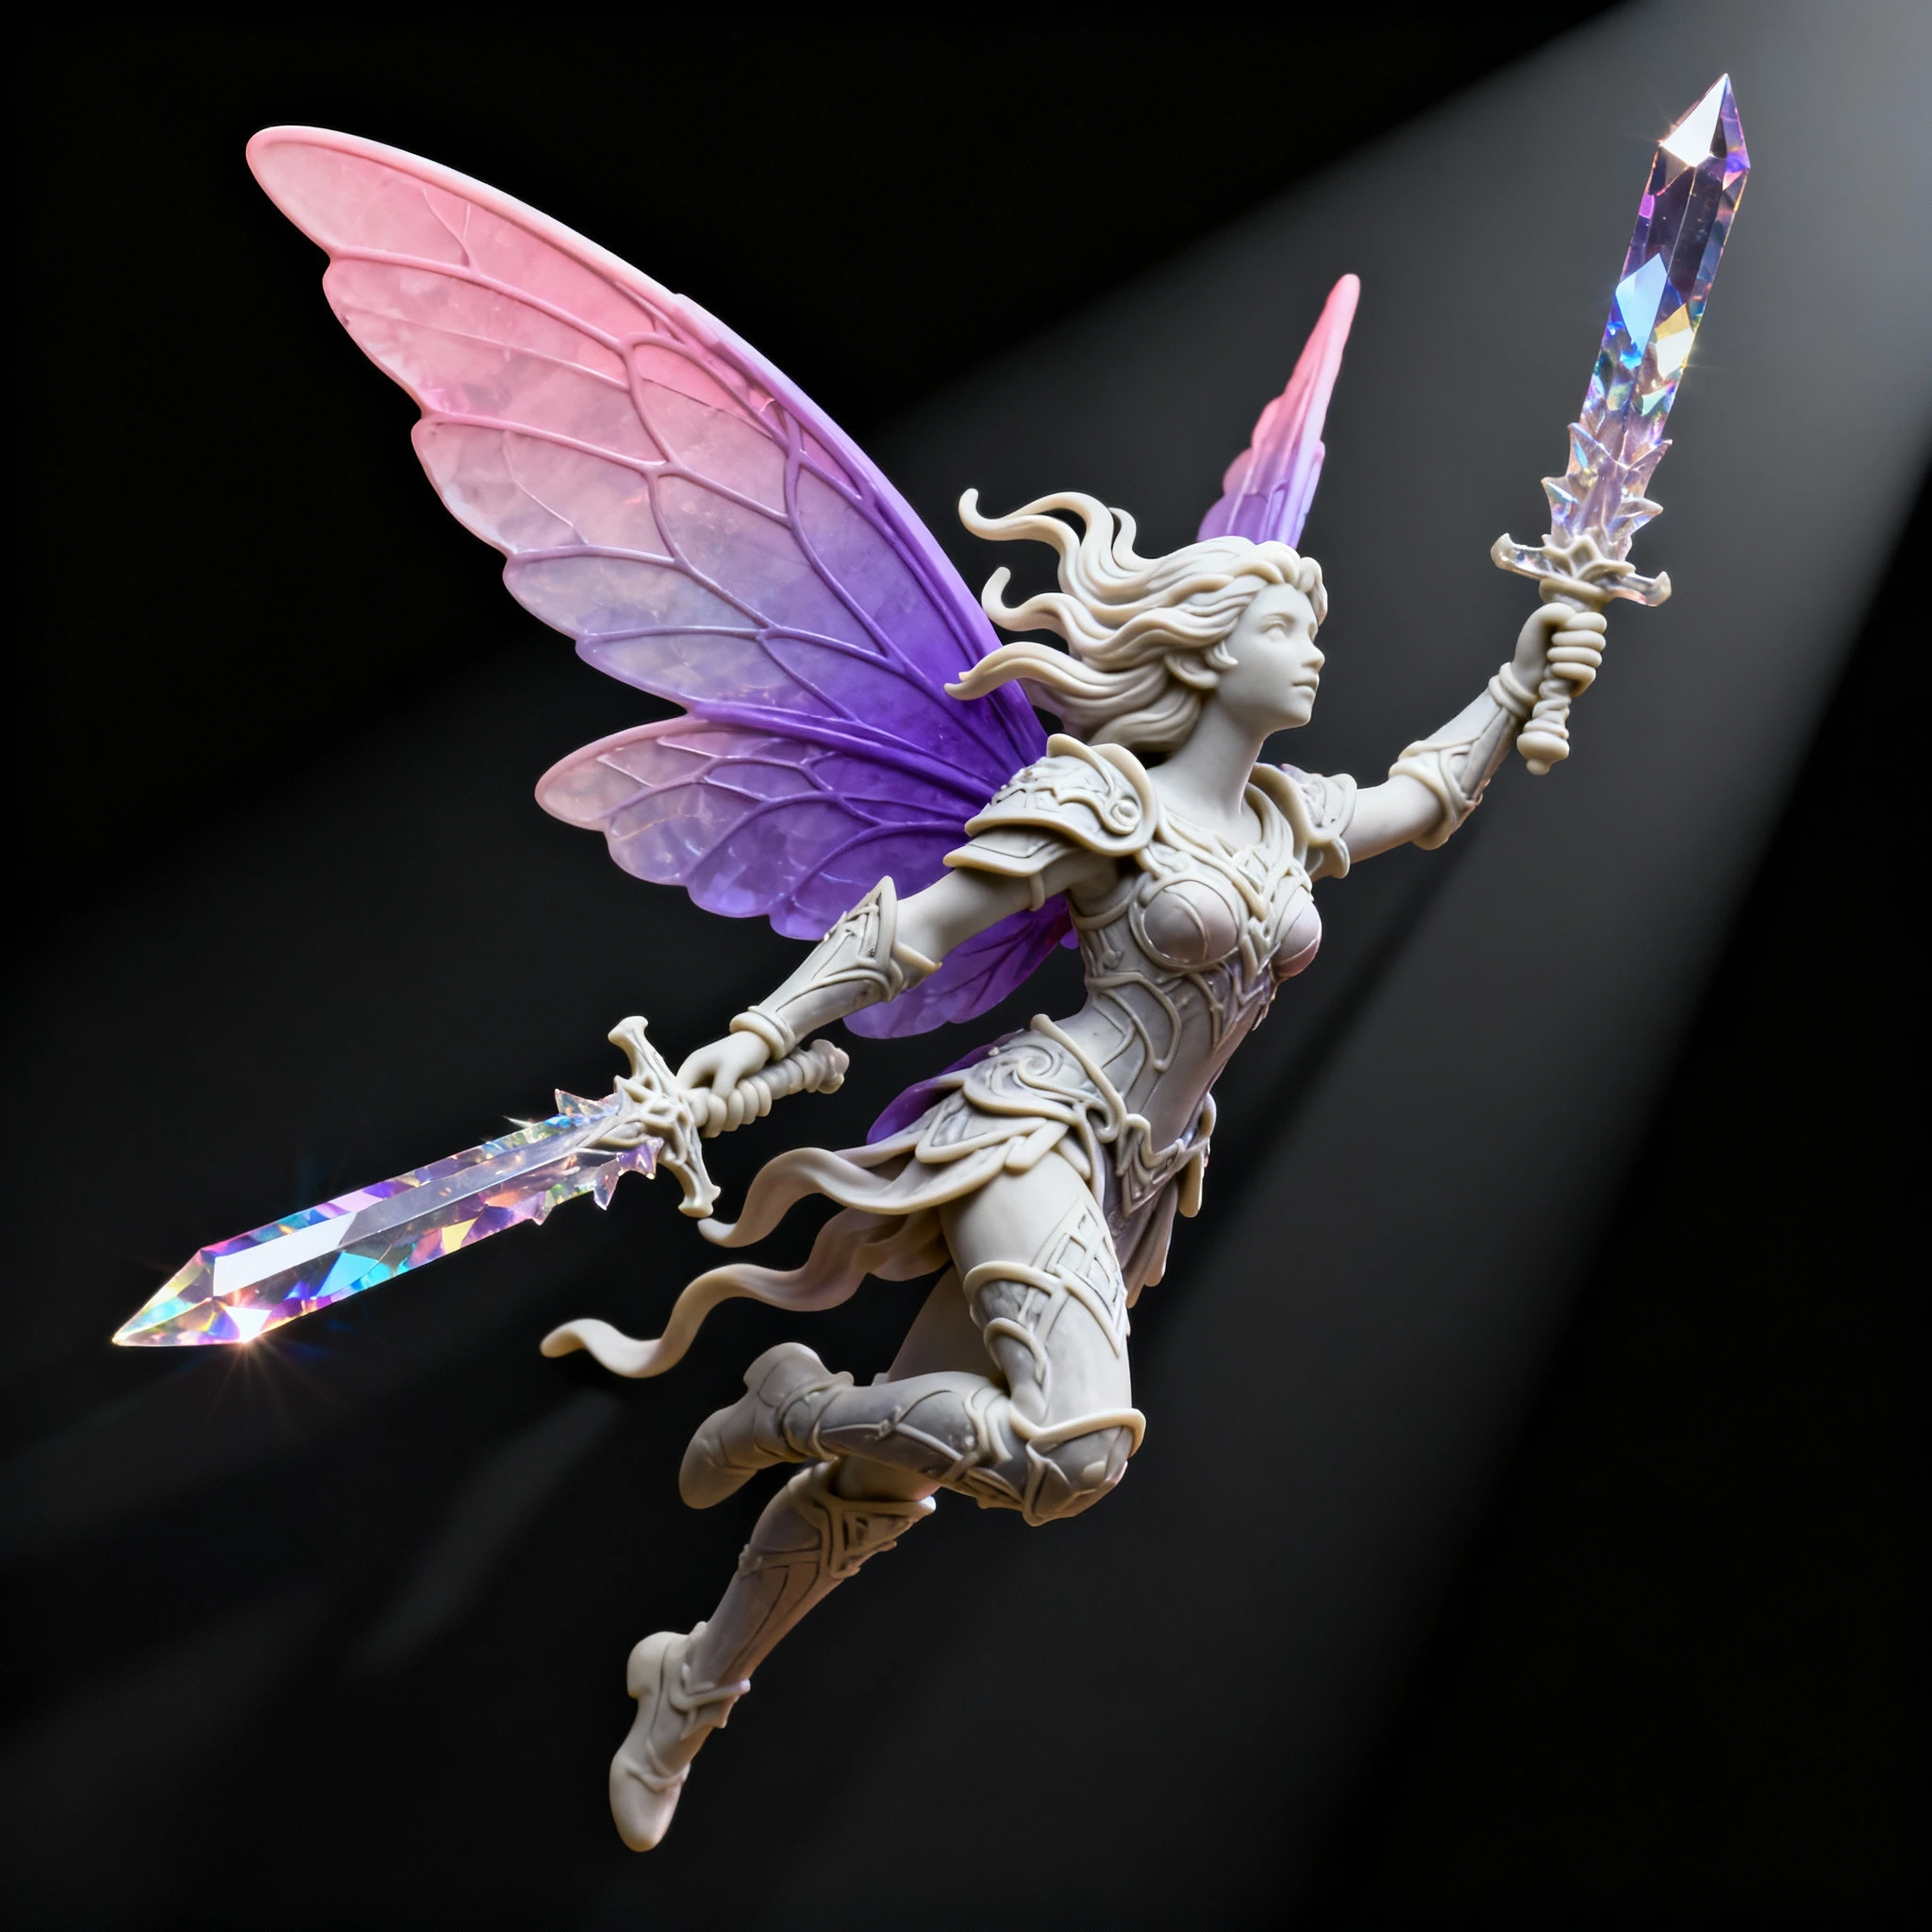
3D resin figurine of a fairy warrior, dynamic flying pose, translucent wings with gradient color, holding a crystal sword. High detail for 3D printing, 32mm scale miniature, dramatic lighting, 8k resolution.
3.3 Fan Art & Character Tributes (Gaming, Anime, Comics)
Fans reimagine their favorite characters as collectible figurines. These images are popular on social media, concept art portfolios, and crowdfunding campaigns for unofficial merchandise.
Application: Recreate iconic characters in specific toy formats.
Example Prompts:
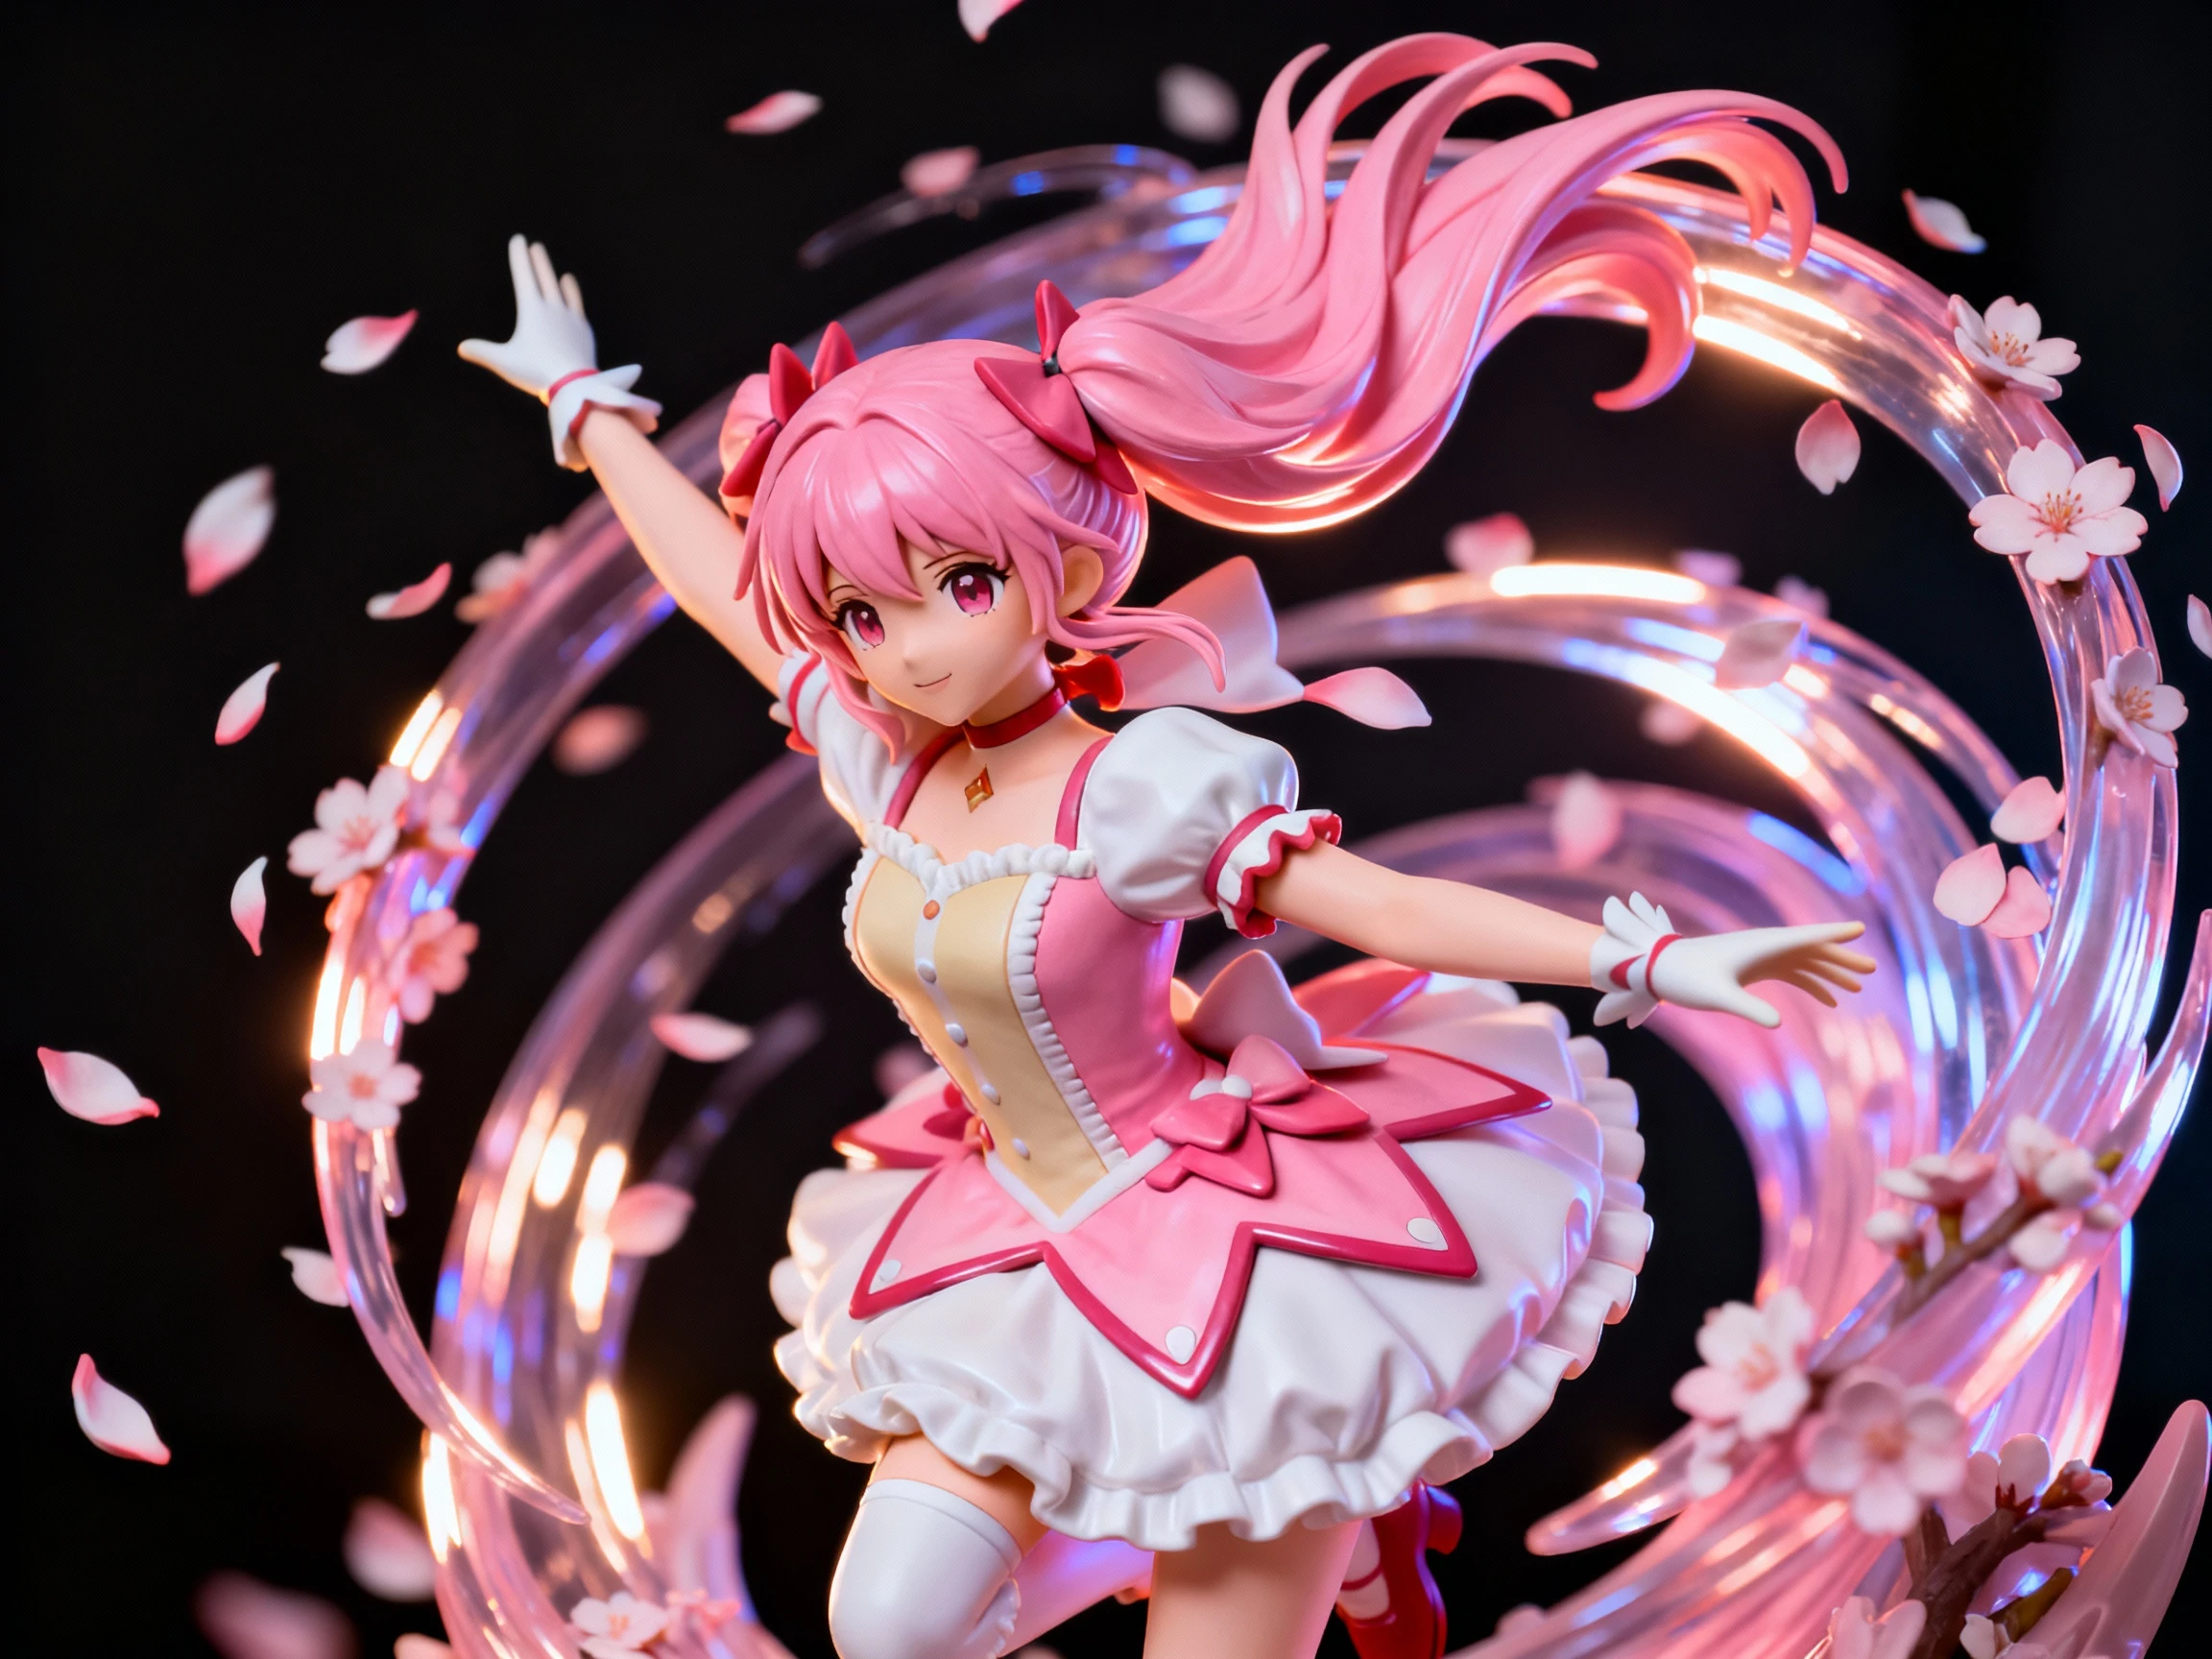
3D anime figurine of a magical girl character with flowing pink hair, mid-transformation pose, cherry blossom petals swirling. Glossy PVC finish, 1/8 scale statue style, dramatic rim lighting, premium collectible quality.
3D action figure of a post-apocalyptic survivor, rugged outfit with leather patches, holding a makeshift weapon, standing on rubble base. Realistic weathering, polystone material, museum-quality statue, cinematic lighting.
3.4 Marketing & Product Presentation (Brands & Campaigns)
Companies use figurine renders for marketing campaigns, merchandise mockups, and promotional materials without the upfront cost of physical prototyping.
Application: Create product mockups for Kickstarter campaigns or client presentations.
Example Prompts:
3D corporate mascot figurine of a friendly robot holding a laptop, smiling, company colors: blue and white. Clean geometric design, matte finish, standing on branded hexagonal base, professional product photography, 4k.
Limited edition 3D figurine set for a music festival, three DJs in distinctive outfits with LED stage equipment. Metallic paint accents, clear resin effects for lasers, collector's edition packaging visible in background.
4. Figurine Prompt Writing Guide
Crafting the perfect figurine prompt is an art. Understanding the vocabulary and structure will help you achieve professional results consistently.
4.1 Figurine Prompt Structure Formula
Use this proven structure for maximum control:
[Style] + [Character Description] + [Pose/Action] + [Material/Finish] + [Base/Stand] + [Lighting] + [Quality Tags]
Example Breakdown:
[Nendoroid style] + [cute witch with purple hat and cloak] + [waving gesture, smiling] + [matte PVC with glossy staff] + [standing on spell circle base] + [soft studio lighting] + [4k, octane render, product photography]
4.2 Style Keywords (Toy Formats)
Different toy formats have distinct proportion rules:
🧸 Chibi/Super Deformed
- Nendoroid: Head 1:1 body ratio, swappable faces, cute aesthetic
- Funko Pop: Large square head, tiny body, minimalist features
- Chibi: 2-3 heads tall, rounded shapes, kawaii style
- Keywords: "cute", "chibi", "deformed proportions", "big head"
🧍 Realistic/Premium
- 1/6 Scale Action Figure: 12" tall, articulated, highly detailed (Hot Toys style)
- 1/8 Scale Statue: 8-10" tall, fixed pose, premium paint (Good Smile Company)
- Polystone Statue: Heavy, museum-quality, painted resin
- Keywords: "realistic", "detailed", "premium collectible", "1/6 scale"
🎨 Designer/Art Toys
- Vinyl Toy: Smooth, urban art style, limited edition aesthetic
- Sofubi: Japanese soft vinyl, retro kaiju-inspired
- Designer Toy: Artistic, abstract, gallery-worthy
- Keywords: "designer vinyl", "art toy", "urban style", "limited edition"
🎲 Tabletop Gaming
- 28mm / 32mm Miniature: D&D scale, detailed for painting
- Warhammer Style: Heroic proportions, exaggerated weapons
- Keywords: "miniature", "32mm scale", "tabletop gaming", "detailed sculpt"
4.3 Material & Finish Keywords
Materials define how light interacts with your figurine:
💎 Plastic Varieties
- PVC: Standard smooth plastic, slight sheen
- ABS: Hard plastic, sharper details
- Glossy Plastic: Reflective, toy-like sheen
- Matte Vinyl: Soft, no reflections, urban toy aesthetic
✨ Premium Materials
- Polystone / Resin: Heavy, high-end collectible feel
- Cold Cast Bronze: Metallic finish, statue-like
- Translucent / Clear Resin: See-through effects for magic, ice, glass
🎨 Surface Treatments
- Hand-painted: Visible brush strokes, artisan quality
- Weathered: Scratches, dirt, battle damage
- Metallic Paint: Gold, silver, copper accents
- Gradient / Ombre: Color fade effects
4.4 Pose & Base Design
🧘 Pose Types
- Neutral/T-Pose: Arms slightly out, standing straight (for reference sheets)
- Action Pose: Mid-combat, jumping, casting spell
- Sitting/Relaxed: Cross-legged, sitting on edge, casual
- Dynamic: Hair and clothing flowing, movement implied
🏛️ Base & Stand Options
- Simple Circular Base: Clean, professional, focuses on figure
- Diorama Base: Thematic environment (grass, ruins, urban street)
- Clear Acrylic Stand: For flying/jumping poses
- Themed Base: Matches character (wizard on spell circle, robot on tech platform)
4.5 Lighting & Quality Enhancers
💡 Lighting Styles
- Soft Studio Lighting: Even, no harsh shadows, commercial product look
- Dramatic Rim Light: Backlight highlighting the silhouette
- Bokeh Background: Blurred lights behind for depth
- Spotlight: Single focused light, theatrical
📸 Quality Booster Tags
Add these at the end of your prompt:
4k, 8k, high detail, octane render, c4d, blender render, product photography, professional lighting, depth of field, bokeh, sharp focus, high fidelity
4.6 Negative Prompts for Figurines
Always exclude:
2D, flat, sketch, drawing, painting, illustration, anime screenshot, cartoon, blurry, low resolution, pixelated, deformed, distorted, bad anatomy, extra limbs, extra fingers, missing limbs, disfigured, poorly drawn, amateur, text, watermark, signature, logo, cropped
5. FAQs
Q1: Can I use these AI-generated figurines for 3D printing?
These are 2D renders, not 3D model files, so you cannot directly 3D print them. However, they serve as excellent visual references for:
- Concept Validation: Test if a design is appealing before investing time in 3D modeling
- Client Pitches: Show clients what the final product could look like
- Sculpting Reference: Use as blueprints when modeling in ZBrush, Blender, or Nomad Sculpt
- Turnaround Sheets: Generate front/side/back views to guide your modeling process
Many 3D sculptors use AI-generated images as "north star" references to maintain proportion and detail consistency.
Q2: How do I maintain character consistency across multiple figurines?
Consistency is crucial for creating figurine series. Use these techniques:
Seed Control: If your platform supports it, lock the seed number after generating a successful character. This keeps core features stable.
Reference Image Method: Generate your first character, then use that image as a reference for subsequent generations while modifying only specific elements (outfit, pose).
Detailed Character Description: Create a "character bible" prompt with fixed traits:
Core traits: blue spiky hair, green eyes, red scarf, mechanical left arm
Variable: [different outfit/pose for each generation]
Style Locking: Keep style keywords identical across all prompts (e.g., always use "Nendoroid style, matte vinyl, soft lighting").
Q3: What's the difference between Nendoroid, Funko Pop, and Designer Vinyl styles?
Nendoroid:
- Origin: Japanese (Good Smile Company)
- Proportions: 1:1 head-to-body ratio
- Features: Swappable faces, accessories, highly detailed for small size
- Aesthetic: Cute, anime-inspired, pastel colors common
- Best for: Anime characters, game characters, kawaii designs
Funko Pop:
- Origin: American (Funko)
- Proportions: Large square head, tiny body (roughly 3:1)
- Features: Minimalist facial features, stylized, collectible focus
- Aesthetic: Bold colors, simple shapes, iconic silhouettes
- Best for: Pop culture characters, celebrities, brand mascots
Designer Vinyl:
- Origin: Urban art scene (Kidrobot, Medicom)
- Proportions: Variable, often abstract or stylized
- Features: Artistic interpretation, limited editions, gallery-worthy
- Aesthetic: Matte finish, bold graphics, street art influence
- Best for: Original characters, art toys, fashion collaborations
Q4: How do I create realistic weathering and battle damage effects?
Add specific material keywords to your prompt:
Light Wear:
Subtle weathering, slight paint chips on edges, soft dust accumulation, realistic wear
Heavy Battle Damage:
Heavy battle damage, scratches, dents, chipped paint revealing metal underneath, dirt and grime, post-apocalyptic weathering
Vintage/Aged:
Vintage toy aesthetic, yellowed plastic, faded colors, retro 1980s collectible, nostalgic wear
Rust & Corrosion:
Oxidized metal parts, rust spots, corroded joints, abandoned for years aesthetic
Q5: What resolution should I generate for different uses?
Social Media Posts (Instagram, Twitter):
- 1:1 Square: 1080x1080px minimum
- Generate at 2048x2048px or higher, downscale for upload
Portfolio / ArtStation:
- Landscape or Portrait: 2560x1440px minimum
- Generate at 4K (3840x2160px) for maximum detail
Print Reference Sheets:
- 300 DPI required for crisp printing
- For 8x10" print: Generate at least 2400x3000px
- For large posters: Use AI upscaling tools after generation
3D Modeling Reference:
- Dual monitor setup: 1920x1080px per view
- Turnaround sheets: Generate 3-4 angles at 1024x1024px each, combine in Photoshop
Q6: Can I sell products based on AI-generated figurine designs?
This depends on several factors:
Original Characters: If the figurine depicts your own original character, you generally own the commercial rights to the AI-generated image (check your AI platform's terms).
Fan Art / IP Characters: Generating figurines of copyrighted characters (e.g., Marvel, Disney, anime) for personal use is generally acceptable, but selling them may violate copyright laws.
Commercial Use Clearance:
- Verify your AI platform's commercial license (Nano Banana Pro, Dreamina terms)
- Ensure the character design is original or you have licensing rights
- For selling physical products, consult IP lawyers if adapting recognizable characters
Q7: How do I create a turnaround reference sheet?
Turnarounds show your character from multiple angles, essential for 3D modeling.
Method:
- Generate Individual Views:
- Front view: "[Character description], front view, T-pose, white background"
- Side view: "[Same character], side view, standing straight, white background"
- Back view: "[Same character], back view, showing rear details, white background"
- 3/4 view (optional): "[Same character], three-quarter angle view"
- Consistency Tips:
- Keep lighting identical ("soft even lighting, no shadows")
- Use same seed if possible
- Keep character description word-for-word identical
- Only change the angle keyword
- Compilation:
- Combine all views in image editor
- Arrange horizontally: Front | Side | Back
- Add grid background for scale reference
Q8: What are the best materials for translucent/glowing effects?
For magical, energy, or sci-fi effects:
Translucent Resin:
Clear translucent resin with internal LED effect, glowing blue energy core, see-through limbs with gradient fade
Frosted/Gradient Effects:
Frosted acrylic material, gradient from solid purple to transparent tips, ethereal ghost-like appearance
Embedded Elements:
Clear resin with embedded glitter particles, galaxy effect inside transparent body, swirling cosmic clouds
Neon/LED Simulation:
Neon glowing accents, LED lights visible inside transparent housing, cyberpunk illuminated circuits, bright cyan glow
Q9: How do I design a collectible series that feels cohesive?
Creating a unified collection requires strategic planning:
Theme Unity: Choose a strong central concept
- Examples: "Zodiac Warriors," "Steampunk Animals," "Element Guardians"
Visual Consistency:
- Same style (all Nendoroid, or all Designer Vinyl)
- Shared color palette (e.g., pastel tones, or neon + black)
- Consistent material (all matte vinyl, all glossy PVC)
- Same base design (all standing on hexagonal bases)
Variation Within Rules:
- Change colors/outfits while keeping silhouette similar
- Different accessories but same pose structure
- Themed variations (summer vs. winter versions)
Rarity Tiers (For blind box appeal):
- Common: 6-8 standard designs
- Uncommon: 2-3 with metallic paint
- Rare: 1 chase figure with special effects (glow-in-dark, clear variant)
Q10: What if my generated figurine has anatomical errors?
AI can sometimes produce deformed hands, extra fingers, or twisted limbs.
Prevention Strategies:
Use Negative Prompts:
Deformed, distorted, bad anatomy, extra limbs, extra fingers, missing limbs, fused fingers, malformed hands
Simplify Complex Poses: Instead of "doing a backflip while juggling," try "standing confidently, arms at sides."
Hide Problematic Areas:
- "Hands behind back"
- "Holding object (hides finger details)"
- "Wearing gloves"
- "Arms crossed"
Generate Multiple Variations: Create 4-8 images and pick the one with correct anatomy.
Post-Processing: Use AI inpainting tools or Photoshop to manually fix small errors after generation.
Conclusion
The 3D Figurine Generator democratizes toy design and character visualization, allowing creators to explore concepts that once required expensive prototyping or advanced 3D modeling skills. Whether you're designing the next viral blind box series, creating reference sheets for 3D printing, or building a portfolio of collectible concepts, mastering the prompt structure and style vocabulary outlined in this guide will elevate your figurine art to professional quality. From chibi Nendoroids to premium polystone statues, the only limit is your imagination. Start generating your collectible designs today and bring your characters to life in stunning 3D form.